%

MFP Scanner Epson sous Debian/Devuan

Article publié, le et modifié le
6 minutes de lecture

Cet article contient 1191 mots.
Source brute de l'article :
Commit version : 84e32c6

Description

Cet article devrait vous permettre d’utiliser la partie des scanners, pour votre imprimante multi-fonctions, appelée MFP .

Les logiciels suivants sont disponibles depuis le site web officiel de téléchargement d’Epson - http://download.ebz.epson.net/dsc/search/01/search/?OSC=LX :

Une fois installé, vous le retrouverez à-partir du menu “Applications” > “Graphisme”.

Info

Deux pilotes seront utilisés, selon votre imprimante MFP :

Pilote Epkowa

Ce pilote concerne principalement les imprimantes MFP suivantes :

  • Stylus, Stylus Photo, Stylus Office
  • certaines Workforce,
  • diverses XP,
  • et bien d’autres…

Plus d’infos

Passons à l’installation et la configuration d’Image Scan v2 Il est possible que ces imprimantes puissent utiliser la v3 , aussi !

Pilote Utsushi

Le pilote Utsushi est un nouveau pilote en cours d’écriture.

Le dépôt officiel : https://gitlab.com/utsushi/utsushi

Il est prévu à certain terme l’intégration dans le projet Sane, mais il est actuellement considéré en tant que “External Backend”. http://www.sane-project.org/lists/sane-backends-external.html#S-UTSUSHI

Ce pilote concerne principalement les imprimantes MFP suivantes :

  • certaines séries DS, EC, EP, ES
  • la série des EcoTank ET
  • beaucoup des séries WF, et XP
  • et bien d’autres encore…
Astuce

Installation

Maintenant, passons à l’installation soit, à partir :

Epson Scan v2

Actuellement à la version 6.7.65, ce logiciel est très simple d’utilisation.

La version 6 est disponible à partir de cette URL : http://support.epson.net/linux/en/epsonscan2.php

Une fois téléchargée, décompressez-la ; dirigez-vous dans le répertoire nommé “epsonscan2-bundle-6.7.65.0.x86_64.deb” puis exécutez le script install.sh, avec les droits administrateurs.

$ epsonscan2-bundle-6.7.65.0.x86_64.deb
# ./install.sh`

Lors de la première fois, une première fenêtre “Ajouter un scanner réseau” s’ouvre et demande de restituer l’adresse IP de votre MFP.
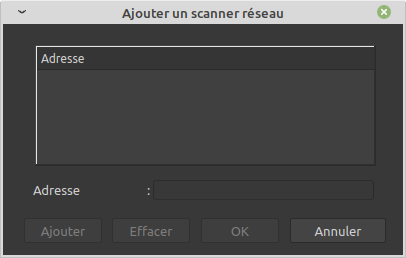
Capture Écran du logiciel 'Epson Scan 2 v6.6.2.x'

Puis cliquez sur le bouton [ Ajouter ] qui se sera activé, suivi d’un clic sur le bouton [ OK ].

Il n’y a plus qu’à l’utiliser, voire à modifier quelques paramètrages, à vos besoins. Les boutons [ Aperçu ] et [ Numériser ] sont en bas.

Image Scan v2

Obsolète

Il est nécessaire d’avoir le package xsltproc installé dans le système… Si ce n’est pas fait, faites-le !

Le nom du driver utilisé n’est ni epson, ni epson2, mais bel et bien epkowa ! Pensez-y, avant de modifier tout fichier de configuration, surtout relative aux fonctions réseaux.

Pour ce qui est d’utiliser la partie scanner de votre imprimante, il faut encore aller piocher directement sur leur site.

C’est une archive complète nommée iscan-bundle-1.0.0.x64.deb.tar.gz.

Une fois téléchargée, décompressez-la ; dirigez-vous dans le répertoire nommé “iscan-bundle-1.0.0.x64.deb”, puis exécutez le script install.sh, avec les droits administrateurs.

$ cd iscan-bundle-1.0.0.x64.deb
# ./install.sh

Il est probable qu’il faille modifier le fichier de configuration /etc/sane.d/dll.conf, afin d’ajouter le nom du pilote epkowa.

Modifiez le fichier de configuration /etc/sane.d/epkowa.conf pour ajouter :

  • Pour la connexion USB : usb 0x04b8 0xProductID
    • lsusb | grep "04b8" : pour connaître l’identifiant produit ProductID relatif à votre matériel
  • Pour une connexion réseau : net adr_ip 1865 (où adr_ip est l’adresse ip, relative au MFP)

Exemple de fichier /etc/sane.d/epkowa.conf:

# epkowa.conf -- sample configuration for the EPKOWA SANE backend
# Copyright (C) 2004, 2008, 2009  Olaf Meeuwissen
#
# See sane-epkowa(5), sane-usb(5) and sane-scsi(5) for details.
# Detect all devices supported by the backend.
# If you don't have a SCSI device, you can comment out the "scsi"
# keyword.  Similarly for the other keywords.
#

usb
scsi

# For any USB scanner not known to the backend (yet), you may, at your
# own peril(!!), force the backend to recognise and use it via libusb.
# You can do so by the following configuration command:
#
#   usb <USB vendor ID> <USB product ID>
#
# SEIKO EPSON's USB vendor ID is '0x04b8' (without quotes).  In order
# to find the USB product ID, use lsusb(1).
# A sample configuration for the Epson Perfection 1650 (Epson GT-8200),
# which has a product ID of 0x0110, would look as follows:
#
#usb 0x04b8 0x0110

# For SCSI devices not detected, you can add an entry like:
#
#   scsi EPSON GT-20000
#
# where the GT-20000 bit corresponds to the SCSI model information as
# shown in the output of dmesg(1) or in the /var/log/kern.log file.

# Network attached devices may be made to work by first installing the
# (non-free) iscan-network-nt package and then adding configuration lines
# as per information below.
#
# For each network attached device, you must add an entry as follows:
#
#   net <IP-address|hostname> [port-number]
#
# Ask your network administrator for the device's IP address or check
# for yourself on the panel (if it has one).  The port-number is very
# optional and defaults to 1865.
# Note that network attached devices are not queried unless configured
# in this file.
#
# Examples:
#
#net 192.16.136.2 1865
#net 10.0.0.1
#net scanner.mydomain.com

# Some backend behaviour can be customized by using the option keyword
# followed by an option name, as shown below.
#
#   option <option-name>
#

# Currently available options:
#
# Makes the automatic document feeder the default document source
#option prefer-adf

Image Scan v3

Obsolète

La version 3 est disponible à partir de cette URL : http://support.epson.net/linux/en/imagescanv3.php

Une fois téléchargée, décompressez-la ; dirigez-vous dans le répertoire nommé “imagescan-bundle-debian-10-3.65.0.x64.deb.tar.gz”, puis exécutez le script install.sh, avec les droits administrateurs.

$ cd imagescan-bundle-debian-10-3.65.0.x64.deb.tar.gz
# ./install.sh

Le fichier de configuration principal sera/est : /etc/imagescan/imagescan.conf. Son écriture peut encore évoluée, néanmoins voici un exemple de configuration actuelle :

# /etc/imagescan/imagescan.conf -- Image Scan configuration
# Refer to the documentation for details on the configuration options
# for the software.  Plugins should come with their own documentation
# if they have configuration options.
#
# Lines starting with a # or a ; are comments.  Comments must be on a
# line of their own.  End-of-line comments are not supported.

[devices]

myscanner.udi    = esci:networkscan://adresse-ip:1865
myscanner.vendor = Epson
myscanner.model  = EcoTank ET-3700

Explications :

  • myscanner.udi est le nom de l’interface utilisée. Dans cette exemple, c’est l’interface réseau qui est interrogée.
  • myscanner.vendor et myscanner.model sont des chaînes de caractères, totalement arbitraires, à renseigner à votre convenance.

Documentation

Epson fournit de la documentation, en anglais, pour aider à configurer le logiciel :

=> Epson Scan :

=> Image Scan.

  • pour la v2 : page html
  • pour la v3 : page html